Developing Genie
This page is a starting point for anyone wishing to contribute to and enhance the Genie scanner and parser.
Introduction
Genie is an Open Source and Free Software project. The source code is openly available from the GNOME software repository and you are free to copy and use the software under the terms of the GNU Lesser General Public License (LGPLv2.1+).
Genie acts as a parser for the Vala compiler and makes up only three files within the Vala repository. The relation between Genie, the Vala compiler and the C compiler is illustrated and explained below.
There are several ways to contribute to and enhance Genie. These include submitting bug reports, submitting patches and reviewing patches. This page gives more detail on these processes to make it quicker and easier to contribute to the project.
Issue Tracking
Bugs and feature requests for Genie are recorded on GNOME GitLab alongside Vala issues. Before filing a new issue, search the existing issues to check if a bug or feature request is not already recorded. When filing a bug, include a simple test case that illustrates the problem.
A patch to the Genie parser can be submitted as a merge request against the Vala repository.
Genie's Relation to valac
When starting to analyse a problem with compiling a program it is useful to break the compilation process down into three stages. The first stage is carried out by the Genie parser and translates the program source file into a Vala abstract syntax tree (AST). The second stage is carried out by the valac compiler and translates the AST into C code. The third stage is carried out by a C compiler, gcc by default, and compiles the C source file into a binary.
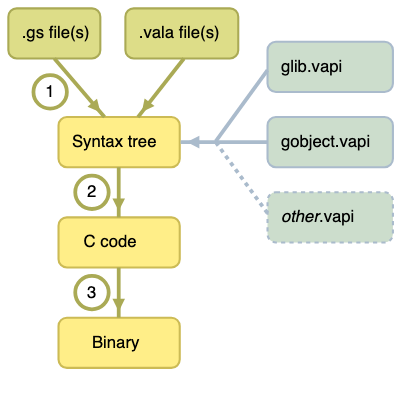
Further details are given below on how to examine the output of each stage. Note that valac can process other input files at the same time as Genie source files.
Stage 1 - Genie Parser
The Genie parser is made up of three files in the valac source code, all under vala/ in the main Vala repository:
valagenietokentype.vala- contains an enumerated list of tokens. This file is unlikely to need modifying unless adding new functionality.valageniescanner.vala- the scanner reads.gsfiles and converts the text into tokens.valagenieparser.vala- parses the tokens and creates a Vala AST.
A project can include other files that are then included in the AST. These can be Vala source files and Vala API bindings to C libraries. So it is advisable to develop a simple Genie test program that only includes the feature you are testing. This avoids introducing any unnecessary uncertainties into the testing. The only two Vala API files that are included automatically are for GLib and GLib's GObject system.
Use the --dump-tree=filename.vala switch with valac to see the AST converted to Vala code. This is useful to check if the parser is working as expected.
Stage 2 - C Code Generation
The Vala compiler will use the AST to generate C code. At this stage the Genie parser has finished its work, so any bugs seen here are likely to be within the Vala compiler itself or an error in the C bindings. The Genie parser, however, may not have created the AST correctly and this can be ruled out by coding the test in Vala to compare with the Genie results.
To only see the C code and not produce a binary use the --ccode switch with valac.
Stage 3 - C Compiler
At this stage you are probably a long way from a bug in the Genie parser itself, but it is useful to understand there are powerful debugging tools available for C compiled programs.
gdb, the GNU Project debugger, or a graphical front end to gdb, such as Nemiver, can be used to step through binaries produced from Genie code. Use the --debug switch with valac. This inserts line numbers from the Genie code into the C code, which are then included in the binary and are displayed with gdb's output. To both see the C code and produce the binary use the --save-temps switch with valac.
valgrind can also be used for dynamic analysis of the program. This is useful for tracking down memory leaks.
Unit Tests
When submitting a bug report it is helpful to attach a test case to show the problem. This can be used to test any patch submitted.
Vala has a test suite that can be browsed at tests/ in the Vala repository.
Note
There is currently no dedicated test suite for Genie in the Vala source code. Contributions adding Genie tests would be very welcome.
Building valac from Source
To start tracking down the cause of a bug and developing a fix for it you need to build the Vala compiler from its source code. The instructions that follow are for a GNU/Linux operating system, such as Fedora or Ubuntu, but Vala can also be built on Windows or macOS with the right tools.
These instructions place the Vala compiler in your local user directory. This makes your development valac independent of the valac you would normally use to compile Genie programs. This allows normal Genie coding to continue, while keeping development of the fixed compiler separate.
Setting up a Build Environment
The Vala compiler is self-compiling so a copy of valac will be needed. The Vala repository is built with GNU Autotools and make (see the upstream README for the canonical steps).
Anyone already compiling Genie programs will have the following installed, but they are listed here for completeness:
| Description | Fedora command | Ubuntu / Debian command |
|---|---|---|
| Vala compiler | dnf install vala | apt-get install valac |
| GLib and headers | dnf install glib2-devel | apt-get install libglib2.0-dev |
| A C compiler (GCC) | dnf install gcc | apt-get install gcc |
You will also need Autotools, make, version control, and some additional packages:
| Description | Fedora command | Ubuntu / Debian command |
|---|---|---|
| GNU make | dnf install make | apt-get install make |
| Autoconf, Automake, Libtool | dnf install autoconf automake libtool | apt-get install autoconf automake libtool |
| Autoconf archive macros | dnf install autoconf-archive | apt-get install autoconf-archive |
| Git, version control | dnf install git | apt-get install git |
| Bison (for gobject-introspection) | dnf install bison | apt-get install bison |
| Flex (for gobject-introspection) | dnf install flex | apt-get install flex |
| GObject Introspection headers | dnf install gobject-introspection-devel | apt-get install libgirepository1.0-dev |
Compiling valac to a Local Directory
The following instructions use two directories under your home directory ($HOME):
$HOME/vala/source/— created when you clone the Vala repository; this is where you runmakeand where the build artifacts live.$HOME/vala/installed/— created and filled when you runmake install; this is the install prefix (for examplebin/valac) from./autogen.sh --prefix=$HOME/vala/installed/.
The first stage is to download a copy of the Vala source code repository and generate the configure script. This stage is done once you do the following:
# 1. Download a copy of the Vala source code
git clone https://gitlab.gnome.org/GNOME/vala.git $HOME/vala/source/

# 2. Change current working directory to Vala source
cd $HOME/vala/source/

# 3. Generate build system and configure install prefix (no sudo for a local prefix)
./autogen.sh --prefix=$HOME/vala/installed/
The next stage is to build and install valac from source with make. This will be repeated each time you want to test your modifications to the source code:
# 1. Compile valac
make

# 2. Run Vala test suite (optional but recommended before submitting changes)
make check

# 3. Install valac to local directory
make install
To use your locally built valac, prefix its location to your PATH for the current shell session:
export PATH="$HOME/vala/installed/bin:$PATH"Creating a Patch with git
Check Your Identity
Patches should be submitted with your full name and a valid email address. Check these have been set up in git with:
git config user.name
git config user.email
To set them globally use:
git config --global user.name "Your Name"
git config --global user.email your@email
To set them just for the current project replace --global with --local.
Refresh Your valac and Create a Branch
It is best to work with an up-to-date version of the Vala compiler. This is so when it comes to submitting your patch it is less likely to need revision because of changes upstream.
A great advantage of git is the ease of creating branches. It is easy to create a branch, try out some ideas, commit the changes in the branch and if you decide you don't like them, just delete the branch.
A typical way of starting hacking would be:
git checkout main
git pull origin
git checkout -b name_of_working_branch
Tips on Working
While developing the idea, using just make and then make install to build valac is quicker than running the full test suite (make check) each time.
The aim is to create a clear and simple patch or set of patches. git rebase --interactive main provides a powerful way of re-organising commits in a local branch so what was originally developed over four or five commits, for example, can be squashed into one or two simpler commits. A reviewer of the patch doesn't need to know the development stages, but the patch needs to be clear in what it does and how it does it.
Final Checks
Before generating the patch it is best to make sure valac is built from the most up to date version and that the changes you have made work against a clean source. Something like this:
git checkout main
git pull origin
git checkout name_of_working_branch
git rebase main
rm -rf $HOME/vala/installed/*
make distclean 2>/dev/null || true
./autogen.sh --prefix=$HOME/vala/installed/
make
make check
make install
Then run your test cases against the version of valac just generated. So long as everything works it is time to submit your changes.
Submit a Merge Request
The recommended way to contribute is by opening a merge request on GNOME GitLab.
- Fork the Vala repository to your personal GNOME GitLab account.
- Push your branch to your fork.
- Open a merge request against the
mainbranch ofGNOME/vala.
If you prefer (or need to) attach a patch file rather than open a merge request, you can still generate one with:
git log --oneline -10
git format-patch <abbreviated_hash>
where <abbreviated_hash> is the commit just before your work. The resulting .patch files can be attached to a GitLab issue.
Reviewing a Patch
A submitted patch needs to be reviewed by someone else to check that it:
- resolves the bug / feature request
- maintains compatibility with previous versions of Genie
- meets the security standards of the project
- provides a simple and elegant solution
- meets the coding standards of the project (see the Vala Hacking Guide)
Refresh the Build Environment
Before applying the patch, remove the old build of valac and make sure the Vala source is clean and up-to-date:
rm -rf $HOME/vala/installed/*
cd $HOME/vala/source
make distclean 2>/dev/null || true
git checkout main
git pull
Download and Apply the Patch
If the patch was submitted as a merge request, the easiest way to review it is to check out the contributor's branch directly using GitLab's instructions on the merge request page (typically the Check out branch button).
If the patch was attached to an issue as a .patch file, you can apply it in a fresh test branch:
cd $HOME/vala/source
git checkout -b testing_branch
git apply name_of_patch_downloaded.patch
./autogen.sh --prefix=$HOME/vala/installed/
make
make install
Then run the contributor's test cases against the newly built valac to confirm the patch works as expected.
See Also
- Introduction to Genie - syntax overview and tutorial.
- Genie Tutorials, Blogs and Code Examples - additional learning resources.
- Contributor Guide - general guidelines for contributing to the Vala project.